Introduction#

What era are we in, still using traditional state management libraries? Come learn Pinia!
The origin of the name Pinia is also interesting. In Spanish, Pinia is the closest English pronunciation of the word for pineapple, and a pineapple is made up of clusters of individual flowers combined together, creating multiple fruits. Similar to stores, each one is independent but ultimately connected.
When we open the vuex GitHub repository, we see the official prompt Pinia is now the new default. As the new official state management library for Vue, Pinia has more advantages, solving many of the problems left by Vuex, making the writing process more logical. Let's try to understand it!
Advantages of Pinia#
- Supports both vue3 and vue2
- Abandons Mutation operations, only
state,getter, andaction Actionssupport both synchronous and asynchronous- Supports using plugins to extend Pinia's functionality
- No need for nested modules, more in line with Vue3's
Composition API - Supports TypeScript
- Code is more concise
Creating a Store with Pinia#
First, let's quickly create an empty project and install Pinia:
npm install pinia
Although Pinia supports vue2, if your Vue version is lower than Vue2.7, you need to install the composition API separately: @vue/composition-api * (It is recommended to upgrade to Vue2.7 directly, as the transition won't be too large compared to Vue3, but it will provide better support for the Vue ecosystem) *
Import Pinia in main.ts:
import { createApp } from 'vue'
import { createPinia } from 'pinia'

import App from './App.vue'


const app = createApp(App)

app.use(createPinia())

app.mount('#app')
Next, we create counter.ts in src/store and write the basic template:
import { defineStore } from "pinia";

export const mainStore = defineStore('main', {
  state: () => {
    return {
      helloWord: 'HelloWorld'
    }
  },
  getters: {

  },
  actions: {

  }
})
After creating the store mainStore, we will use it in the component.
<template>
  <div class="">{{ store.helloWord }}</div>
</template>

<script lang="ts" setup>
import { mainStore } from "../store/counter";
const store = mainStore();
</script>

<style scoped></style>
When the page displays helloWorld, it indicates that the store has been created successfully.
Changing Data State with Pinia#
We add data count to the state in counter.ts:
import { defineStore } from "pinia";

export const mainStore = defineStore('main', {
  state: () => {
    return {
      count: 0,
      helloWord: 'HelloWorld'
    }
  },
  getters: {

  },
  actions: {

  }
})
Create a button with a click event:
<template>
  <div>
    <button @click="handleClick">Modify Data State</button>
  </div>
</template>

<script setup lang="ts">
import { mainStore } from "@/stores/counter";
const store = mainStore();
const handleClick = () => {
  store.count++;
};
</script>
After importing it into App.vue, modify the data state:
<template>
  <Click />
  <CountButton />
</template>

<script lang="ts" setup>
import Click from "./components/Click.vue";
import CountButton from "./components/CountButton.vue";
</script>
At this point, you will find that clicking the button changes the value of count.
In actual development, we often need to call data from the store multiple times. If we have to use {{store.****}} every time to change its value, it can be cumbersome. We can destructure it:
<template>
  <div class="">{{ store.helloWord }}</div>
  <div class="">{{ store.count }}</div>
  <hr />
  <!-- After destructuring, we can omit store, reducing the amount of code -->
  <div>{{ helloWord }}</div>
  <div>{{ count }}</div>
</template>

<script lang="ts" setup>
import { mainStore } from "../store/counter";
import { storeToRefs } from "pinia";
const store = mainStore();

// Destructure
const { helloWord, count } = storeToRefs(store);
</script>

<style scoped></style>
Note that destructuring must use the storeToRefs() function!
Four Methods to Modify Data in Pinia#
- First method:
const handleClick = () => {
  store.count++;
};
- Second method
$patch
const handleClickPatch=()=>{
	store.$patch({
		count:store.count+2
	})
}
Although the second method is not as simple as the first, it is more suitable for changing multiple data.
- Third method
$patch passing a function
const handleClickMethod = () => {
  // Here state refers to the state in the store
  store.$patch((state) => {
    state.count++;
    state.helloWord = state.helloWord === "jspang" ? "Hello World" : "jspang";
  });
};
- Fourth method
action
When the business logic is complex, write the method in the action of the store.
actions: {
    changeState() {
      this.count++
      this.helloWord = 'jspang'
    }
  }
Getters#
Getters in Pinia are similar to those in Vuex, equivalent to computed properties in Vue. However, when we look at the Vuex documentation, we find this note:
Note
Starting from Vue 3.0, the results of getters are no longer cached like computed properties. This is a known issue that will be fixed in version 3.1. For details, see PR #1878.
This note still exists today, which is one of the reasons I recommend using Pinia.
Getters in Pinia can be cached internally, verified with code:
getters: {
    phoneHidden(state) {
      // Regular expression
      console.log('getters called');
      return state.phone.toString().replace(/^(\d{3})\d{4}(\d{4})$/, '$1****$2')
    }
  },
When we call phone (data) twice in the component, check the console.

It will only appear once, confirming its caching functionality, which is beneficial for performance optimization.
Inter-store Calls in Pinia#
In actual development, we often do not use just one store; there is usually a dispatch between stores. Here we create another store:
import { defineStore } from "pinia";

export const nameStore = defineStore('name', {
    state: () => {
        return {
            list: ['Xiao Hong', 'Xiao Mei', 'Fat Girl']
        }
    }
})
Next, we import it in counter.ts, import {jspangStore} from './jspang', and call it in action:
 actions: {
    getList() {
      console.log(nameStore().list);
    }
  }
Check the console, and you will find that you have successfully called the state of another store, achieving mutual calls between stores.
Support for VueDevtools#
Although Pinia is a newcomer, it fully supports VueDevtools, which is very helpful for debugging in actual project development. It is worth mentioning that when opening VueDevtools, we can see a cute pineapple logo
It makes the mood during development even better, haha.
Note: If you are using Pinia v2, please upgrade your
Vue Devtoolsto v6.
Pinia Practical Application: Modifying Avatar#
After all this, let's put it into practice by using pinia in an actual project. Development background: When we create a webpage, we often involve a registration function, where the user avatar is different before and after logging in. If we only write a click event to modify the avatar, once refreshed or navigated, it will revert to its original state, and the status cannot be saved. This is where we can bring in our Pinia.
Note: To achieve persistent storage of data in Pinia (storing in localstorage or sessionstorage), we need to install a plugin: pinia-plugin-persist, which makes our operations more convenient. Here, I won't elaborate further; for details, please refer to the official documentation.
1. Create a Store#
The first step is to create a store (Here it is assumed that you have already configured the relevant environment), create store/user.ts, with the following code:
import { defineStore } from 'pinia';

export const mainStore = defineStore('main', {
    state: () => {
        return {
            login: require('../assets/images/login.png')
        }
    },
    // Enable persistence
    persist: {
        enabled: true,
        strategies: [
            { storage: localStorage, paths: ['login'] }
        ],
    },
    getters: {

    },
    actions: {

    }
})
After successfully creating it, we store the user avatar in the store, and next, we will use it in the component.
2. Call in Component#
<!-- Avatar -->
<a class="face" href="#/login">
   <img :src="store.login" alt="" />
</a>
Open the browser to check:
Successfully called! Next is the most important step, ensuring that the avatar can be successfully stored locally after logging in. We will directly add the operation to modify data in actions:
actions: {
        changeHeadShot() {
            console.log('Data stored successfully');
            this.login = require('../assets/images/head.png')
        }
    }
We will use the action we wrote in the component:
<template>
  <!-- Omit unnecessary code (using Vant components here) -->
      <van-col span="8" @click="headerC">
        <van-button class="btn2" plain hairlin type="primary" to="/">
          <p class="text">Login</p>
        </van-button>
      </van-col>
</template>

<script setup>
// Import store
import { mainStore } from '@/store/user'
const login = mainStore()

// Implement function to modify avatar on click
function headerC() {
  login.changeHeadShot()
}
</script>

<style scoped>
/* Omit unnecessary code */
</style>
Now comes the moment to "witness the miracle": after clicking the login button, the avatar will change:![]()
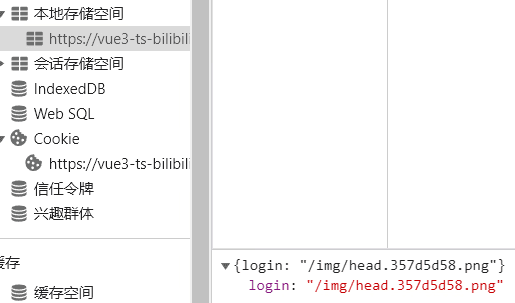
At this point, no matter how we refresh, the avatar will not change. We open the console and check storage in the application, and we can see that our login avatar has been stored in the local browser:

Conclusion#
In summary, whether you have previously encountered Vuex or not, I recommend using Pinia. Compared to Vuex, it has better compatibility, removes Mutation from the Vuex foundation, making the syntax more concise and more in line with Vue3's Composition API. Vuex will no longer be updated and is now in maintenance mode, while Pinia, as the next generation of Vuex, has every reason to be learned and used!